

Example app
The SDK’s source repo ships a full example app under example/ — a dev/debug
tool, not a template to copy into your project. It depends on the SDK the
same way a real consuming app would: a file:.. dependency in its
package.json, symlinked into node_modules and watched by Metro, so
editing SDK source hot-reloads into the example instead of requiring a
publish step. Screenshots throughout these docs are taken from it.
Running it
npm install
# Androidnpm run android
# iOScd ios && pod install && cd ..npm run ios
android/local.properties (the sdk.dir entry) isn’t committed to git —
create it locally, pointing at your Android SDK, before the first Android build.
Both npm run android and npm run ios build debug binaries. No account
or key is needed, and the app talks to no server of ours: everything it
records — track, logs, geofences — stays on the device.
Tour of the screens
The app is a three-tab bottom navigator: Map, Logs, Settings.
Map
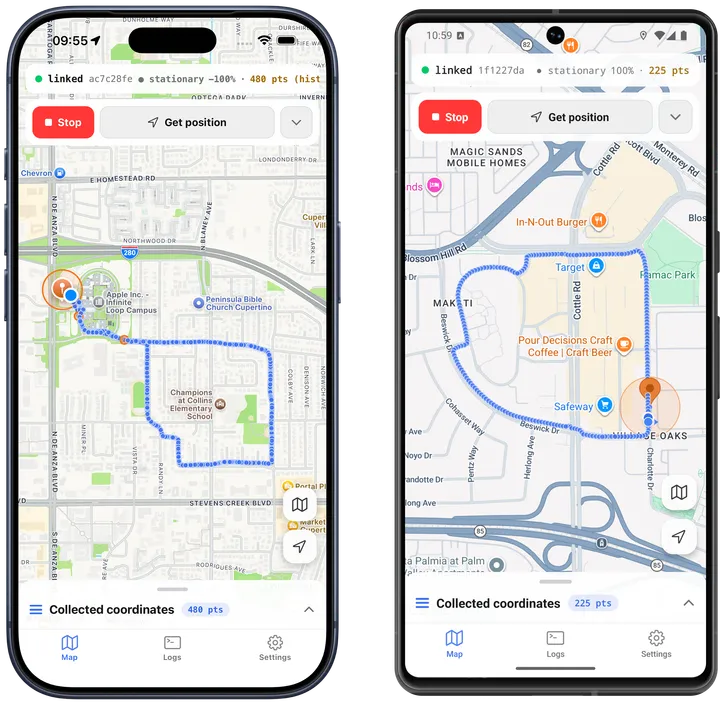
The live map: a status chip (tracking/stopped, moving/stationary, battery
level, point count), Start/Stop tracking, and a getCurrentPosition() button.
The map itself draws the tracked route as a polyline, with Follow, Pts
(point markers), Line, and Geo (geofence) layer toggles, plus a
From/To range picker that swaps the live track for the locally recorded
history in that time range. Long-pressing anywhere on the map opens the
geofence-creation form pre-filled with the tapped coordinates; tapping an
existing geofence’s pin opens the same form for editing or deletion. Geofence
ENTER/EXIT/DWELL events appear as their own markers on the route, colored
distinctly from ordinary location points.
See the geofencing guide for the creation form’s fields and what a registered geofence looks like on this map.
Logs
A live event console (timestamp, [LEVEL], event tag, message, data). It
merges two sources: your own JS-side log lines (streamed live as the app logs
them) and the native engine’s own persisted rows (motion.*, wake.*,
track.*, and more), polled from getLog()
every few seconds. A level filter (all/verbose/debug/info/warn/error),
a follow-tail toggle, and a clear button round it out. See the
logging guide for what ends up in this
stream and how it’s retained.
Settings
Every working Config key, grouped into
sections (Geolocation, Motion/Activity, Power, HTTP/Sync, Persistence,
Geofencing, Application, Diagnostics/Engine, Notification) — platform-only
keys (like iOS’s session-engine toggle or Android’s notification channel
fields) only show up on their platform. Changing a field calls
setConfig() immediately and
persists the override in AsyncStorage; on the next cold start, every
persisted override is merged back over the app’s base config before
ready() is called. That’s what
makes this screen useful for experimentation: you can flip any tracking,
filtering, or upload knob on a real device and see the effect immediately,
without touching code or rebuilding — and a Reset config to defaults
button clears every override back to the app’s baseline in one tap.
Below the config sections, an Engine state panel surfaces
getState() fields, the upload
queue size, and log history size, with buttons to force a
sync() (uploads only when you
have set your own url), destroy
the queue, or reset the odometer.